from google.colab import drive
drive.mount("/content/gdrive")
Mounted at /content/gdrive![]()
In 2015 the idea of creating a computer system that could recognise birds was considered so outrageously challenging that it was the basis of this XKCD joke:
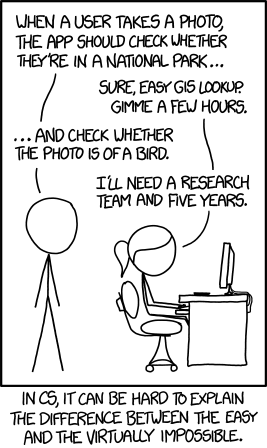
But today, we can do exactly that, in just a few minutes, using entirely free resources!
The basic steps we’ll take are:
First, we need to setup an access to Google Drive. This is to persist data or artifacts in a local drive even when we are not connected to Google Colab.
from google.colab import drive
drive.mount("/content/gdrive")Mounted at /content/gdriveThen, install fastai and duckduckgo-search as necessary dependencies and import them.
!python -m pip install -Uqq fastai duckduckgo-search ━━━━━━━━━━━━━━━━━━━━━━━━━━━━━━━━━━━━━━━━ 5.7/5.7 MB 28.8 MB/s eta 0:00:00
━━━━━━━━━━━━━━━━━━━━━━━━━━━━━━━━━━━━━━━━ 8.0/8.0 MB 52.7 MB/s eta 0:00:00from duckduckgo_search import DDGS
from fastai.vision.all import *
from fastcore.all import *
from fastdownload import download_url
from time import sleepLet’s start by searching for a bird photo and seeing what kind of result we get. We’ll start by getting URLs from a search:
First, we define a helper function called search_image to get downloadable image links. And try searching for a bird photo.
def search_images(term, max_images=30):
    """
    Get image urls from the given term.
    """
    with DDGS() as ddgs:
        ddgs_images_gen = ddgs.images(
            term,
            max_results=max_images
        )

        print(f"Searching for '{term}' ...")
        urls = L(ddgs_images_gen).itemgot("image")

    return urls
urls = search_images('bird photos', max_images=1)
urls[0]Searching for 'bird photos' ...'https://images.pexels.com/photos/1661179/pexels-photo-1661179.jpeg?cs=srgb&dl=green-bird-1661179.jpg&fm=jpg'Note that DuckDuckGo get an image urls from text search not image search. That is why we have to include photos in the keyword.
…and then download a URL and take a look at it:
dest = "gdrive/My Drive/practical-deep-learning/bin/bird.jpg"
download_url(urls[0], dest, show_progress=False)

im = Image.open(dest)
sim = im.to_thumb(256, 256)
sim
to_thumb method is for resizing an image to be able to used few resources to show on the output. Also, note that the shape of an image is defined by its height and width respectively.
sim.shape(256, 219)Now let’s do the same with “forest photos”:
dest = "gdrive/My Drive/practical-deep-learning/bin/forest.jpg"
download_url(search_images('forest photos', max_images=1)[0], dest, show_progress=False)

Image.open(dest).to_thumb(256, 256)
Searching for 'forest photos' ...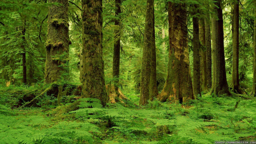
Our searches seem to be giving reasonable results, so let’s grab a few examples of each of “bird” and “forest” photos, and save each group of photos to a different folder (I’m also trying to grab a range of lighting conditions here):
searches = "forest", "bird"
conditions = "sun", "shade"
path = Path("gdrive/My Drive/practical-deep-learning/bin/bird-or-not")

for s in searches:
    dest = path/s
    dest.mkdir(exist_ok=True, parents=True)

    # Pause between searches to avoid over-loading server
    download_images(dest, urls=search_images(f"{s} photo"))
    sleep(10)

    for c in conditions:
        download_images(dest, urls=search_images(f"{s} {c} photo"))
        sleep(10)

    resize_images(dest, max_size=400, dest=dest)
Searching for 'forest photo' ...
Searching for 'forest sun photo' ...
Searching for 'forest shade photo' ...
Searching for 'bird photo' ...
Searching for 'bird sun photo' ...
Searching for 'bird shade photo' ...Note that resize_images operates recursively by overwriting files in dest. Also, it is reducing the file size to the limited max_size so that we can keep data in a local drive.
Some photos might not download correctly which could cause our model training to fail, so we’ll remove them permanetly from disk:
failed = verify_images(get_image_files(path))
failed.map(Path.unlink)

print(f"Removed {len(failed)} invalid images!")
Removed 6 invalid images!To train a model, we’ll need DataLoaders, which is an object that contains a training set (the images used to create a model) and a validation set (the images used to check the accuracy of a model – not used during training). In fastai we can create that easily using a DataBlock, and view sample images from it:
dls = DataBlock(
    blocks=(ImageBlock, CategoryBlock),
    get_items=get_image_files,
    splitter=RandomSplitter(valid_pct=0.2, seed=42),
    get_y=parent_label,
    item_tfms=[Resize(192, method='squish')]
).dataloaders(path, bs=32)

dls.show_batch(max_n=6)
Here what each of the DataBlock parameters means:
blocks=(ImageBlock, CategoryBlock),The inputs to our model are images, and the outputs are categories (in this case, “bird” or “forest”).
get_items=get_image_files,To find all the inputs to our model, run the get_image_files function (which returns a list of all image files in a path).
splitter=RandomSplitter(valid_pct=0.2, seed=42),Split the data into training and validation sets randomly, using 20% of the data for the validation set.
get_y=parent_label,The labels (y values) is the name of the parent of each file (i.e. the name of the folder they’re in, which will be bird or forest).
item_tfms=[Resize(192, method='squish')]Before training, resize each image to 192x192 pixels by “squishing” it (as opposed to cropping it).
Now we’re ready to train our model. The fastest widely used computer vision model is resnet18. You can train this in a few minutes, even on a CPU! (On a GPU, it generally takes under 10 seconds…)
fastai comes with a helpful fine_tune() method which automatically uses best practices for fine tuning a pre-trained model, so we’ll use that.
learn = vision_learner(dls, resnet18, metrics=error_rate)
learn.fine_tune(3)
Downloading: "https://download.pytorch.org/models/resnet18-f37072fd.pth" to /root/.cache/torch/hub/checkpoints/resnet18-f37072fd.pth
100%|██████████| 44.7M/44.7M [00:00<00:00, 123MB/s]| epoch | train_loss | valid_loss | error_rate | time |
|---|---|---|---|---|
| 0 | 0.881389 | 0.016011 | 0.000000 | 00:37 |
| epoch | train_loss | valid_loss | error_rate | time |
|---|---|---|---|---|
| 0 | 0.110143 | 0.000960 | 0.000000 | 00:58 |
| 1 | 0.060484 | 0.000762 | 0.000000 | 00:55 |
| 2 | 0.041855 | 0.001080 | 0.000000 | 00:51 |
Generally when I run this I see 100% accuracy on the validation set (although it might vary a bit from run to run).
“Fine-tuning” a model means that we’re starting with a model someone else has trained using some other dataset (called the pretrained model), and adjusting the weights a little bit so that the model learns to recognise your particular dataset. In this case, the pretrained model was trained to recognise photos in imagenet, and widely-used computer vision dataset with images covering 1000 categories).
For details on fine-tuning (or in general, transfer learning) and why it’s important, check out the Whatelse to know to deep learning in practice?
As a side note here, although the fine_tune method was trained on 3 epoch, you can see that it needs additional epoch to modify some weight and architecture to match with our problem. That’s why we have the first result table shown.
Let’s see what our model thinks about that bird we downloaded at the start:
is_bird, _, probs = learn.predict(PILImage.create("gdrive/My Drive/practical-deep-learning/bin/bird.jpg"))

print(f"This is a: {is_bird}.")
print(f"Probability it's a bird: {probs[0]:.4f}")
This is a: bird.
Probability it's a bird: 0.9999Note that predict method needs to accept TensorImage as an argument so an object called PILImage or PillowImage was used. Also, it returns 3 outputs:
Good job, resnet18. :)
So, as you see, in the space of a few years, creating computer vision classification models has gone from “so hard it’s a joke” to “trivially easy and free”!
It’s not just in computer vision. Thanks to deep learning, computers can now do many things which seemed impossible just a few years ago, including creating amazing artworks, and explaining jokes. It’s moving so fast that even experts in the field have trouble predicting how it’s going to impact society in the coming years.
One thing is clear – it’s important that we all do our best to understand this technology, because otherwise we’ll get left behind!
Reference: Is it a bird? Creating a model from your own data